Tuesday, April 29, 2014

Tea Book Box!

Do you have a case of the gnomes?  Has your stash gone missin'?   Do you love your tea as much as I do?  Well I have answer for you my fellow leaf-lover. 

This idea will inspire and compel you to grab an old crappy hard-cover book, an exacto blade, 6 inch ruler, scotch tape, a piece of some box paper stuff (from a granola bar box or something), carpenters glue and 6 or so clamps with 3 flat planks of scrap wood

Handy exacto blade box - you don't need something this elaborate. 

Lets cut to the chase. 
1.  You'll want to open up the book to the second chapter (just to keep the first pages looking normal and covert). You'll want to keep at least an inch and quarter from the edges as you draw out the square dimensions for cutting. 

2.  Trim out a piece of that granola bar paper box stuff to roughly the dimensions of the book and stick it roughly at the beginning of the last chapter. 

3.  Turn back to the first chapter.  Tape the pages of first chapter to the hard cover so they won't get in the way.  Use the scotch tape to tape down the 6 inch ruler to the right dimensions of the box you drew.

4.  Whip out that exacto blade (carefully, because you can poke out more then an eye) and use it to cut along the ruler edge.  Repeat this task over and over again until you have perfectly cut the edges down to where you've hit the cardboard below.  Try not to cut through the cardboard, but its not a big deal if you do - the point is that your trying to get a nice clean good 90 degree edge on both sides down to the bottom. 

5.  Make sure your changing the exacto blade if it seems at all dull at this point!  Do the same (step 4 and 5) for the top and bottom edge.  End with the back edge.  This is what I found worked to keep the pages stiff until the last cut. The end is tricky because you really have to trim all edges carefully - the pages will pop out when cut perfectly.  Don't rip them out or you'll have bad edges.


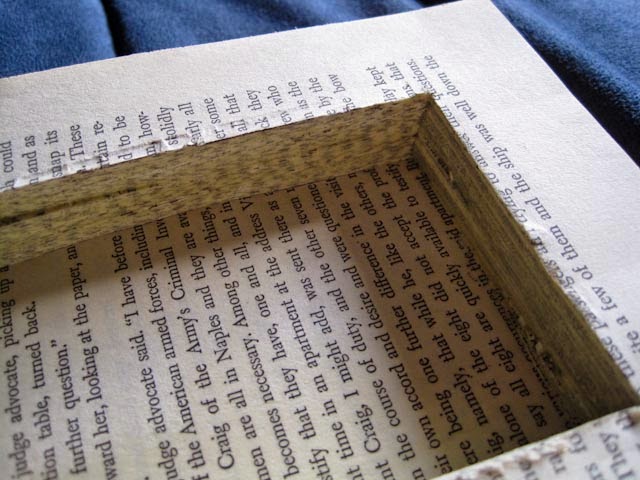
6.  Remove the cardboard thing we put in earlier.  Take the 2 flat planks of wood and clamp them down to the book pages as shown, exposing the inside cut out square. 

7. Squirt out that carpenters glue onto a scrap surface.  Take a 1/4 to 3/8 width flat brush and dip into your little palette of glue to lay down a ample coat of glue on the inside edges of the box.  Whatever excess glue that drips can be painted around the bottom surface (thinnly).  Clean it up nice. 

8.  Clamp down the last plank of wood in the middle. Leave to dry for about 12+ hours.   Remove the clamps and planks.  If the book has a little ripply edge when closed, clamp the book closed for another 2 days or so to try and make the pages permanently flat so it won't be suspected of holding your tea stash. 


Covert!  Those gnomes wouldn't suspect a thing. 
Voila!  Now if you really want your awesome box to be unreachable from the gnomes, and even the fairies if you put books on top - take a look at the last pic.  I don't have a DIY for it because I haven't done it myself, but you can figure it out now genius - your a DIY dutchess/duke now.   Tea time!  


Saturday, April 5, 2014

Trail Camera!


This s a bit of a deviation from the tea topic, but you can always drink tea while reading my blog.  It is Tea with Wes.  I am drinking tea too - a white tea! 

So obviously this blog deals with the fun of trail cams and a few tips on how to operate them properly.  I've been operating with the Moultrie M-45 GameSpy trail camera.  Received it form Canadian Tire for 125 dollars on clearance 1/2 year ago or so.  I've been operating with chinese Ni-MH rechargeable D cells in there to avoid reoccurring expenses for batteries.  So far so good - been using it daily through a very long and cold winter and had no problems that I haven't been able to learn from.

Now for the fun stuff.  The series of photos below are taken largely at night, hence the black and white look. This camera uses the standard IR LEDs to light up the subject  So in other words -- no flash!  The animal might look at the dim red glow that emits from the LEDs, but it never has scared them as far as I can tell.

This is the trail cam as attached on a tree with some bobcat footprints in front of it.
During the fall season, this rabbit came 7 feet away from me while I was dropping some corn in the evening.  I've known 'em all year so I guess he's comfortable me!
Blue jays love the corn.  This big brick here is a salt lick.  I wanted to see what deer populace was still around in the fall, and they love a good salt lick.

Black squirrel munching on a meal.  You can see a blue jay tail to the right.  Black squirrel is apparently a grey squirrel, but can have genes bred with different phases. Don't know why this occurs.  They are new to these parts.

Whoa!  Where did they come from?
I convinced my nieces to take a pic after trudging through a long hour a snow. Troopers they were after all the activity. 
Coyote bum.  The subject is moving at a walking pace, but the camera has to wake up and flip the shutter fast.  Too slow - learned from that.  Moved camera.  I could have had a pic of 2 deer if I had positioned the camera down the path. 
This is where I had some fun with 1 days photo feed.  A lot of raven and crow pics. Generally speaking, and ravens are the bigger guys, as you can see the diff.
Every once and while there is a pretty large reunion of these dudes.  I'm still not great as differentiating between crows and ravens, but I believe these are crows.  


I could be wrong, but judging form the size, these are ravens. See the thicker lower feathers on the legs of the bottom guy and the larger larynx of that bad ass.  Even look at his eyes -- gleaming awesomeness. Aerodynamic psycho.
Ever see birds them do this?  They know where the corn is!  Under the layer of snow.

Synchronized!  There is a raven passing by in the top left. 

This is my brother Jonathan checking out the view from the tree stand I set up not far away!

So this me with a sports camera on my head that I was testing out and laying down some corn for the starving creatures.  Long winter!
So this dude seems to be characteristic of a lynx when I looked up in the animal book I have.  Big prints! 


This happens with the IR function at night. The exposure has to be a little longer and so you get motion blur with this model. Newer models went through the effort of correcting this. 

Not always will a camera shoot something off to the side like this.  The IR sensitivity for this camera is very center focused and only for 20 or so feet.  But there is what I think is a lynx.

I am told this could be a bobcat.  Hard to tell size, but also hard to see if there are any spots which are a better giveaway between a lynx and bobcat.

Looks pretty cute eh?  Love to befriend him.  But the reason he's around is because of chicken bones I set out.  And we have living chickens which he may just have a liking for. 

Another shot.

Munching on the chickens scraps. 
A lovely marten!  Never seen one of these!  Checking out the leftovers.

Digging up whatever leftovers from the last guy there. 

Family checking out the tracks of the marten.
Every once and a whilte you get a nice shot like this randomly. Probably a bird set it off. 

There you have it.  The seasons highlights of literally hundreds of shots.  Oh -- 1 other thing these cameras can do is record video.  Pretty darn dandy if you have a easy program to sift through videos.


My top tips

- Test the shots to get the right camera height, angle and distance to where the subject is expected to be.
- Bring your point and shoot digital cam with you.  Exchange cards on the fly. Don't stand around the camera too long (your scent will set off the area and make animals wary of the space).
- Bring an extra set of batteries with you, even if you think the trail camera batteries shouldn't be dead.
- Lay down a bit of scraps that will attract the animals you'd like to see. 
- Make sure you test the aim function in the dark which basically highlights the area where the IR photo sensor is set.
- Make sure there is no daily limit of how many photos the camera can shoot in 1 day.  Check the settings to what the intervals for photos will be between shots when something is actively in the target space.
- Know the camera.  Nothings worse then missing a great subject has walked right by and the camera didn't shoot for some unknown reason.  They are mechanical and will shoot how they are programmed. 

Hope this educates and inspires you to the use and function of trail cameras! 


Chaga Made Simple!

Okay guys, I did all the hard work for you.  All you have to do is find a birch tree, kick a chunk off and start from there.  Simple as that is, I'm making it even simpler!  :)

So you got the stuff off the tree.  Good for you.  Letting it sit for a while in the sun (by a window or something is a great idea since there is moisture built up in the chaga.  When you plunk and chunk and store it in a zip-lock, you'll wanna avoid any musty qualities which could conjure. Your chunk(s) can also be stored in the freezer immediately if you want to avoid the drying process. 

What I have here is an extra crispy dry piece of chaga in a large freezer zip-lock bag.
 I've taken a small chunk that you can see outside the bag to crunch in a mortar and pestle.
Place the grinds into a small slow cooker with water.  This amount will make a very dark coffee colour.
Let it sit for 8 hours or so.
Presto!  I told you -- dark black coffee colour.  I brew the same batch of grinds again to get almost the same depth of colour.

This is basically it.  I used a mortal and pestle, although it is possible to use a espresso grinder.  My experience is that the espresso grinders go through a lot of hell and you have to do some DIY to fix em up again after the blade loosens up.  Some parts of the chaga when ground are as hard as wood.  The espresso grinders are easy to find for $5 from a second hand store. The mortar and pestle is unbreakable.  The 3rd option I have yet to try is a meat grinder (hand crank) thing.  Apparently they work just fine.  If you want a espresso grind (which the meat grinder will not provide) it you can go another step with a hand cranked espresso grinder to build those muscles.  If you don't have a slow cooker, you can always the stove-top with a pot.  But slow cookers are twice as easy to find then even a espresso grinder in a second hand store.

Now I must be honest here.  The brew is not all that bad at all!  I can easily take it straight with nothing added, but to impress yourself, add whatever you'd like. Put it in your favorite juice container!  Add root beer concentrate mixture... your favorite fruit tea mix in the slow cooker, rooibus?  Yes, all those work quite well.  Be creative - I trust you.  Don't blame me if something blows up.  I should add though that like most fresh teas, you would stick the mixture in the fridge for no longer then 2 weeks.

Why would you want to do this?  This is one of the simplest YouTube videos to explain it.  You can always refer to one of my old blog pages on chaga as well which spell out the benefits.